ARTICLE SUMMARY
Pipefy offers many advanced features that allow you to save a lot of time. Combine two of them to create automated approval flows and see for yourself!

Most companies have at least one process that, at some stage, demands someone’s approval. It can be a purchase that needs a supervisor’s approval or a layout change the senior designer needs to approve. Approval flows are everywhere and not handling them correctly can occupy a lot of time.
What if there was a practical way to control approval flows without endless email threads that end up lost in people’s inboxes? Well, lucky for you, there is a way to do that. Even better, it’s practical and easy to setup.
Instead of explaining how it works, I’ll show it to you with a practical example. To begin with, let’s see how you can handle approval flows on Pipefy.
Approval flows on Pipefy
Before we can get into setting up your approval flow, let me explain a few basic things about Pipefy (for those of you that don’t know the platform yet).
Pipefy offers an easily customizable structure that allows you to manage all types of processes, adding complexity as you need to. You can add complexity using one of our many advanced features.
I won’t tell you everything about each of our features because it would turn this article into a book. Instead, I’ll focus on explaining two of these features that are relevant for today’s subject: Automations and Connections.
Long story short, the connections feature allows you to ‘connect’ two processes, creating ‘connected cards’ such as subtasks or approval requests.
Automations, as the name states, allows you to create automated actions triggered by specific events. You can use it to create a new connected card whenever a card is moved to a phase.
Remember these features, they’re essential for setting up automated approval flows!
Simple approval flow
If your company is small and you can add the people responsible for approving requests to each process they need to approve requests in, awesome.
Even though you’d still benefit from setting up an automated flow, you can keep things simple by creating an approval phase on your process that’s auto-assigned to a specific team member. Whenever a new card enters the ‘approval’ phase, it’s automatically assigned to the process approver.
He/she is notified, accesses the pipe and manually approves (or not) the request and moves it to the next phase.
Does this simple flow work? Absolutely. However, there’s a more practical way of dealing with it that can benefit all types of approval flows.
Complex approval flow (automated)
Let’s suppose you work at the procurement department of a big company. You have a big, complex purchase process in which each request needs to be approved by its department’s supervisor.
You can manage this approval flow manually by creating secondary approval pipes for each supervisor and connecting those pipes to the primary process (purchase process).
That way, each time a request reached the approval phase you’d need to manually create a connected card on the department’s approval pipe and wait for he/she to approve so you can manually move the card to the next phase. What if it could be easier? It can, and that’s what I’m about to show you!
Creating automated approval flows on Pipefy
This is the moment you’ve all been waiting for! I’ll stick to the purchase process example for now, ok? Let’s start with a bit of context:
- You have a purchase process to manage all your company’s purchase requests;
- Each department’s supervisor (marketing or sales, for example) must approve their requests before purchasing.
The first step for setting up this approval flow is creating a primary purchase process and two secondary approval processes, one for sales and one for marketing.
Step 2 is connecting the primary pipe to the secondary approval pipes using the connections feature.
We’ll set up two separate connections:
- One connecting the purchase process to the sales approval flow;
- Another one connecting it to the marketing approval flow.
Once we’re done with the connections part, let’s move on to the automations (click here to learn more about what automations are and how to setup automations).
Since we have two possible departments, we’ll make it a little more complex by adding conditions to our automations.
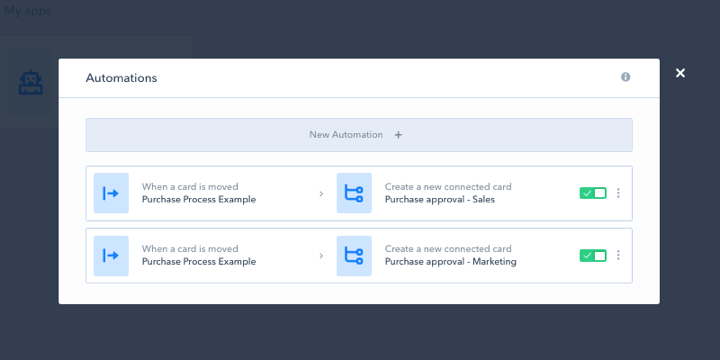
First automation – creating connected cards
We want connected cards to be automatically created in the right approval process (sales or marketing). Let’s start by the sales approval pipe, here’s how you set this up:
Access your company’s dashboard and click on the ‘Apps & Integrations‘ option. Open the ‘automations’ app and click on ‘+ new automation’.
The first step for setting up automation is choosing the event.
In this case, we’ll choose “when a card is moved”.
Choose “purchase process” and then “approval”.
Here’s the first twist: we only want this automation to be triggered when the ‘sales’ option is selected on the department field in the purchase process. To make that possible, we’ll setup a condition.
Click the “add condition” button at the bottom of the event box.
We only want sales requests to create connected cards on the sales approval pipe so we’ll choose:
department > is equal to > sales.
Now we’ll choose the action.
In this case “create a new connected card”.
Choose the pipe where the connected card will be created (purchase approval – sales) and match the fields.
Click the green “save automation” button at the bottom of the screen.
Before we’re done with automation number one, go through the entire process again to setup the automation to create cards on the marketing approval flow.
Second automation – moving the parent card
We’ve set automation #1 to create connected cards on the right purchase approval pipe. Now we want to make sure that whenever the supervisor approves the request, the ‘parent’ card will move forward on the purchase process (to the ‘purchase’ phase).
To do that we’ll create (yet) another automation. We’ll choose:
- Event: ‘when a card is moved’
- In pipe: ‘purchase approval – sales’
- To phase ‘approved’.
Choose the event ‘move the parent card’ in pipe ‘purchase process’ to phase ‘purchase’.
That’s it, repeat the process choosing the ‘purchase approval – marketing’ pipe on the event and…our automated approval flow is done!
We could set yet another automation so that every time the supervisor moves a request to ‘archived’ the original card is archived as well, but I’ll leave that one to you, I’m sure you know all about automations already.
You’re probably thinking “why should I go to all this trouble”. Well, I’ll tell you why. First of all, setting up connections and automations is a lot faster when you get used to it. Second: the time these automations will save you will make it up for the minutes you’ve spent setting them up.
Now it’s your turn! Try setting up your own automated approval flows and come back here to let me know how it worked out for you, ok?


